IKEA RUNSKÄR bath faucet with strainer instructions
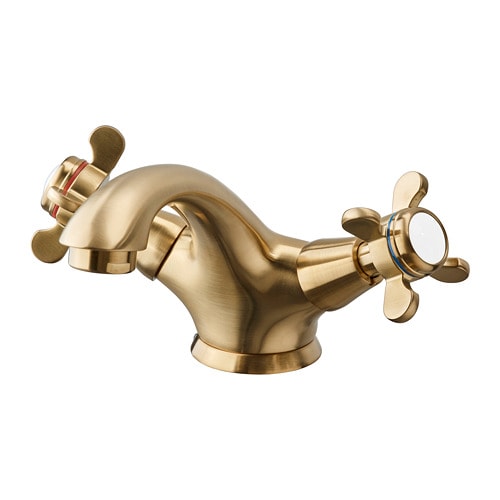
Full Product Name: IKEA RUNSKÄR Bath faucet with strainer, brass color
Article Number: 004.957.32
Number of user manuals: 1
Manuals and Parts List
There is one assembly instruction manual to fully build IKEA RUNSKÄR bath faucet with strainer.
IKEA RUNSKÄR Product Details

RUNSKÄR Bath faucet with strainer, brass color
Article number: 004.957.32
10-year Limited Warranty. Read about the terms in the Limited Warranty brochure.
This is a durable faucet that you can use for many years, since the hard, ceramic discs withstand the friction that always occurs when you change the temperature of the water.
An aerator integrated in the faucet keeps the water flow just right while less water and energy is used.
A durable brass-colored tap in a traditional style with separate handles for hot and cold water. The built-in aerator regulates the water flow, which in turn helps to reduce water- and energy-use.
Measurements:
Height: 3 7/8 " (10 cm)Need help?
Have a question about IKEA RUNSKÄR or Need to request a missing manual?
Questions and Answers
Number of questions: 1
Olsen Wayne
Posted on Dec 29, 2023Can I install the RUNSKÄR Bath faucet without a plumber? If so, are there any specific instructions or tools required for a DIY installation?
Olsen
Kenzo @ EasyRebuild
Answered on Dec 31, 2023Yes, you can install the RUNSKÄR Bath faucet yourself without the need for a plumber. Here are the steps and tools required for a DIY installation:
1. Turn off the water supply to the faucet location and open the faucet to release any remaining water.
2. Disconnect the old faucet by unscrewing the mounting nuts underneath the sink.
3. Clean the surface where the new faucet will be installed to ensure a proper seal.
4. Follow the included installation instructions to properly position and secure the RUNSKÄR faucet.
5. Use the included tools, such as the wrench, to tighten the mounting hardware and ensure a secure fit.
6. Reconnect the water supply and check for any leaks.
7. Turn on the water and test the faucet to ensure proper hot and cold water operation.
The key tools needed are a basin wrench, pliers, and potentially some Teflon tape for the water supply connections. Take your time and follow the step-by-step instructions, and you should be able to successfully install the RUNSKÄR faucet as a DIY project


