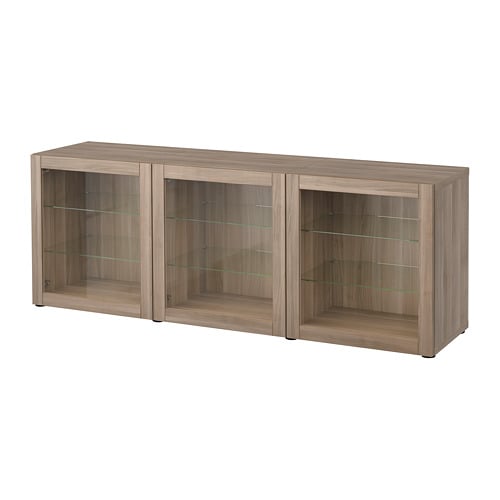
IKEA BESTÅ storage combination with doors instructions
Full Product Name: IKEA BESTÅ Storage combination with doors, walnut effect light gray/Sindvik gray stained walnut eff clear glass, 70 7/8x16 1/2x25 5/8 "
Article Number: 193.250.37
Number of user manuals: 4
Manuals and Parts List
There are 4 assembly instruction manuals to fully build IKEA BESTÅ storage combination with doors. Scroll down to view all.
1. Instructions for IKEA Besta frame walnut effect light gray


2. Instructions for IKEA Besta frame walnut effect light gray


3. Instructions for IKEA Besta glass shelf glass


IKEA BESTÅ Product Details

BESTÅ Storage combination with doors, walnut effect light gray/Sindvik gray stained walnut eff clear glass, 70 7/8x16 1/2x25 5/8 "
Article number: 193.250.37
Adjustable hinges allow you to adjust the door horizontally and vertically.
Adjustable shelves, so you can customize your storage as needed.
Glass-door cabinet keeps your favorite items free from dust but still visible.
Doors both protect and decorate - choose a door that matches well with your home and storage combination.
The doors open with a light push and close silently and softly, as the hinges have both push-open and soft-closing functions.
Optimize and organize your BESTÅ storage with boxes and inserts that you like.
Steady on uneven floors, thanks to the adjustable feet.
Go ahead and put things aside for a while! A sideboard combination gives you plenty of space to store things and a surface to create an attractive display - or to unload serving dishes while you eat.
Measurements:
Width: 70 7/8 " (180 cm)Depth: 16 1/2 " (42 cm)
Height: 25 5/8 " (65 cm)
Need help?
Have a question about IKEA BESTÅ or Need to request a missing manual?
Questions and Answers
Number of questions: 3
Colleen Turner
Posted on May 13, 2023I would like to ask if the doors can be hung on either side of the unit, or is it fixed to one specific side?
Alice @ EasyRebuild
Answered on May 15, 2023The doors on the BESTÅ storage combination can be hung on either side of the unit. The hinges are adjustable, which allows you to adjust the doors horizontally and vertically. This means you have the flexibility to position the doors on the left or right side of the unit, depending on your preference and the layout of your space
Michael Browning
Posted on Feb 02, 2023I have a BESTÅ storage combination with glass doors, and I'd like to know how to clean the doors effectively. Are there any specific cleaning products or techniques recommended by Ikea?
Michael Browning
Alice @ EasyRebuild
Answered on Feb 04, 2023To effectively clean the glass doors on your BESTÅ storage combination, Ikea recommends using a mild glass cleaner and a soft, lint-free cloth. Avoid using abrasive cleaners or scouring pads, as these can scratch the surface of the glass. Simply spray the glass cleaner onto the cloth, then wipe the doors clean. Be sure to dry the glass thoroughly with a clean, dry cloth to prevent water spots. For any stubborn dirt or grime, you can try using a small amount of mild dish soap diluted in water, but always test in an inconspicuous area first. With regular, gentle cleaning, you can keep your BESTÅ glass doors looking their best
Riley Melissa
Posted on Aug 02, 2022I am having trouble assembling the Besta storage combination with doors, specifically with attaching the hinges to the cabinet. Can you provide a detailed instruction or diagram on how to properly attach the hinges?
Riley
Alice @ EasyRebuild
Answered on Aug 04, 2022To properly attach the hinges to the Besta storage cabinet, follow these steps:
1. Locate the pre-drilled holes on the inside of the cabinet frame where the hinges will be attached.
2. Position the hinge plate so the screw holes align with the pre-drilled holes on the cabinet.
3. Secure the hinge plate to the cabinet using the screws provided, making sure the hinges are properly aligned.
4. Attach the hinge arm to the hinge plate by clicking it into place.
5. Repeat steps 2-4 for the remaining hinges, ensuring they are all properly aligned.
6. Once all hinges are attached, you can hang the door by clicking it into the hinge arms.
7. Adjust the door alignment as needed using the adjustment screws on the hinges.
Let me know if you have any other questions


