IKEA VATTENSTEN LED light strip instructions
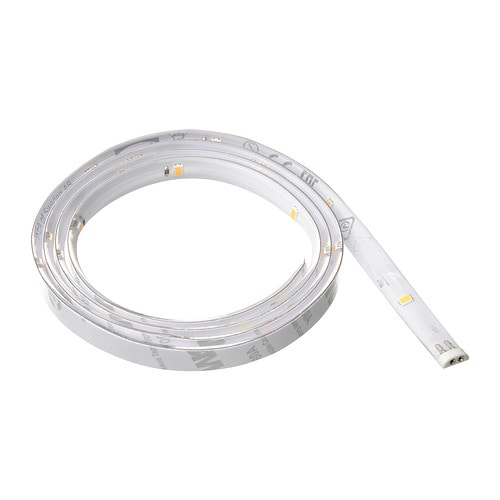
Full Product Name: IKEA VATTENSTEN LED light strip, white, 39 "
Article Number: 105.305.32
Number of user manuals: 1
Manuals and Parts List
There is one assembly instruction manual to fully build IKEA VATTENSTEN LED light strip.
1. Instructions for IKEA Vattensten led light strip white
IKEA parts list for Vattensten led light strip white:
No hardware or fittings found for Vattensten led light strip white.


IKEA VATTENSTEN Product Details

VATTENSTEN LED light strip, white, 39 "
Article number: 105.305.32
The light from this LED lighting strip creates a cozy atmosphere wherever you choose to place it.
The LED lighting strip is bendable, so you can easily fix it behind the TV or a bookcase.
If you do not need its entire length, you can gather excess cable by using the included touch-and-close fastening and cable clips.
You can easily make the lighting strip shorter by cutting it in the places where it is marked with a small scissors symbol.
Easy to fix in place – just remove the paper from the self-adhesive tape and stick the lighting strip where you want it.
Simple to turn on and off by using the button on the cable.
If you want to turn the lighting strip on and off at the same time as you turn the TV on and off, you can connect it directly to the TV's USB-A port by using the included connector.
With this LED lighting strip, you can unleash your creativity and decorate with light in all kinds of places in your home – above cabinets, by the TV or under the sofa. The possibilities are endless!
Measurements:
Cord length: 6 ' 7 " (2.0 m)Length: 39 " (1 m)
Luminous flux: 80 Lumen (80 Lumen)
Power: 2 W (1.5 W)
Need help?
Have a question about IKEA VATTENSTEN or Need to request a missing manual?
Questions and Answers
Number of questions: 4
Loretta
Posted on Feb 23, 2024I want to cut the LED lighting strip, but I'm worried about damaging it. Are there any specific guidelines or precautions I should take when cutting the strip?
Dawn
Posted on Aug 06, 2023What kind of connector is included with the VATTENSTEN LED light strip? Is it a standard USB-A to micro-USB or something else?
Dawn
Stephenson Jason
Posted on Apr 22, 2023Can I cut the light strip to a shorter length than 39"?
S. Jason
Kenzo @ EasyRebuild
Answered on Apr 24, 2023Yes, you can cut the VATTENSTEN LED light strip to a shorter length than 39 inches. The product description states that "you can easily make the lighting strip shorter by cutting it in the places where it is marked with a small scissors symbol."
Andrew
Posted on Oct 31, 2022I have a vattensten led light strip and I'm having trouble with the adhesive tape coming off. Is there any way to reattach it or is this a known issue?
Alice @ EasyRebuild
Answered on Nov 02, 2022The adhesive tape on the VATTENSTEN LED light strip can sometimes lose its stickiness over time, causing the strip to detach from the surface. This is a known issue with some IKEA LED light strips. Here are a few suggestions to help reattach the strip:
1. Clean the surface thoroughly with a degreasing cleaner to remove any dirt or oils that may be preventing the adhesive from sticking properly.
2. Use a stronger adhesive tape, such as a heavy-duty double-sided tape, to re-adhere the strip. Apply the new tape to the back of the strip and firmly press it onto the clean surface.
3. As an alternative, you can also use small mounting clips or brackets to hold the strip in place instead of relying solely on the adhesive tape.
4. If the strip is still not staying in place, you may need to consider permanently mounting it using screws or another more secure attachment method.
Let me know if you have any other questions


