IKEA JONAXEL storage combination instructions
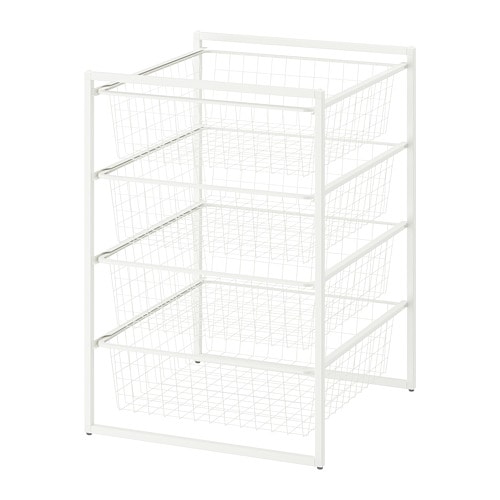
Full Product Name: IKEA JONAXEL Storage combination, white, 19 5/8x20 1/8x27 1/2 "
Article Number: 092.971.34
Number of user manuals: 1
Manuals and Parts List
There is one assembly instruction manual to fully build IKEA JONAXEL storage combination.
IKEA JONAXEL Product Details

JONAXEL Storage combination, white, 19 5/8x20 1/8x27 1/2 "
Article number: 092.971.34
A practical storage combination that helps you keep things organized throughout the home, also in humid areas like bathrooms.
Difficult to keep things neat and tidy? JONAXEL storage solution lets you use the space in smarter ways. Find a suitable combination and use it almost anywhere, even in humid bathrooms and laundry rooms.
Measurements:
Width: 19 5/8 " (50 cm)Depth: 20 1/8 " (51 cm)
Height: 27 1/2 " (70 cm)
Need help?
Have a question about IKEA JONAXEL or Need to request a missing manual?
Questions and Answers
Number of questions: 3
Ronald Wong
Posted on Dec 13, 2023I have a JONAXEL storage combination that I am trying to assemble, but the shelves are not fitting properly into the frame. Are there any specific instructions or tips you can provide for ensuring a snug and secure fit?
Kenzo @ EasyRebuild
Answered on Dec 15, 2023To ensure a snug and secure fit when assembling the JONAXEL storage combination, here are some tips:
Make sure all the frame pieces are properly aligned and connected. The shelves should fit snugly into the frame grooves. Check that the frame is level and not twisted.
Gently tap the shelves into place using a rubber mallet if needed. Avoid forcing them as this could damage the frame.
Verify that the shelf supports are properly installed and securely fastened to the frame. They should be evenly spaced to provide stable support for the shelves.
If the fit is still loose, try adjusting the shelf supports up or down slightly to get the right fit. You may also need to double-check that you have the correct shelf size for this JONAXEL frame.
Take your time and follow the assembly instructions carefully. With a little adjusting, you should be able to get a tight, secure fit for the JONAXEL shelves
Mary Chung
Posted on Aug 10, 2023I'm having trouble installing the Jonaxel storage combination in my bathroom as it's not fitting properly with the existing tile. Is there a specific adhesive or mounting system recommended by Ikea for this product?
M. Chung
Alice @ EasyRebuild
Answered on Aug 12, 2023To install the JONAXEL storage combination in your bathroom, IKEA recommends using the FIXA wall plug set. This set includes wall plugs and screws that are designed to securely mount the JONAXEL frame to tile or other bathroom surfaces. Make sure to pre-drill holes into the tiles using a masonry drill bit before inserting the wall plugs. This will help the storage unit stay firmly in place, even in humid bathroom environments. Additionally, you can use a silicone sealant around the edges of the JONAXEL frame to prevent water from seeping behind it. With the right mounting hardware and sealant, you should be able to successfully install the JONAXEL storage combination in your bathroom
Sean Nelson
Posted on Aug 01, 2023I want to install the Jonaxel storage combination on top of my existing countertop. Can I attach it directly or do I need some kind of adapter? Also, are there any screws or hardware included with the product that can be used for this purpose?
Sean Nelson
Kenzo @ EasyRebuild
Answered on Aug 03, 2023To attach the JONAXEL storage combination directly to an existing countertop, you will need to purchase additional mounting hardware separately. The JONAXEL unit itself does not come with any screws or brackets for direct countertop mounting. You will likely need to use L-brackets or other mounting hardware designed for securing shelving units to a countertop surface. Be sure to follow the manufacturer's instructions carefully and ensure the mounting is secure and can safely support the weight of the JONAXEL unit and its contents. With the right mounting hardware, you should be able to install the JONAXEL directly on top of your existing countertop


