IKEA ELVARLI wardrobe combination instructions
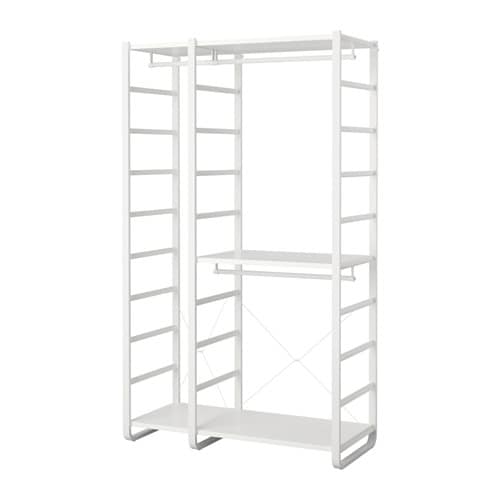
Full Product Name: IKEA ELVARLI Wardrobe combination, white, 49 1/8x21 5/8x85 "
Article Number: 791.581.44
Number of user manuals: 4
Manuals and Parts List
There are 4 assembly instruction manuals to fully build IKEA ELVARLI wardrobe combination. Scroll down to view all.
1. Instructions for IKEA Elvarli clothes rail white


2. Instructions for IKEA Elvarli cross brace white
IKEA parts list for Elvarli cross brace white:


IKEA ELVARLI Product Details

ELVARLI Wardrobe combination, white, 49 1/8x21 5/8x85 "
Article number: 791.581.44
ELVARLI storage system is a versatile solution for your entire home – choose how to combine the products to create an open storage or wardrobe that suits you perfectly.
You can always adapt or complete this open storage solution as needed. Maybe the combination we’ve suggested is perfect for you, or you can easily create your own.
Adjustable shelves and clothes rails make it easy for you to customize the space according to your needs.
A lightweight, durable and adaptable modular wardrobe system.
ELVARLI storage system adapts to your space. The open solution with durable shelves creates an attractive display of your belongings. Psst! Please attach to the wall.
Measurements:
Width: 49 1/8 " (124.8 cm)Depth: 21 5/8 " (55.0 cm)
Height: 85 " (216.0 cm)
Need help?
Have a question about IKEA ELVARLI or Need to request a missing manual?
Questions and Answers
Number of questions: 3
David
Posted on Nov 13, 2023I am trying to install the ELVARLI wardrobe and I'm having trouble with attaching it to the wall. Can you provide more information on how to properly secure it?
Alice @ EasyRebuild
Answered on Nov 15, 2023To properly secure the ELVARLI wardrobe to the wall, follow these steps:
1. Identify the wall material (drywall, concrete, etc.) and select appropriate wall anchors and screws.
2. Locate the wall studs using a stud finder and mark their positions. Try to attach the wardrobe directly to the studs whenever possible.
3. If attaching to drywall without studs, use appropriate wall anchors rated for the weight of the wardrobe. Drill pilot holes and insert the anchors before screwing in the mounting brackets.
4. Carefully lift the wardrobe and align the mounting brackets on the back with the wall anchors/studs. Securely fasten the brackets to the wall.
5. Once the main frame is mounted, you can install the shelves, clothes rails, and other accessories as needed, making sure everything is properly secured.
6. Double-check that the entire wardrobe is firmly attached to the wall before loading it with items.
Let me know if you have any other questions
Parks John
Posted on May 23, 2023I am trying to assemble my ELVARLI wardrobe combination, but I am having trouble with the shelves not fitting properly. Are there any specific instructions or tips for attaching the shelves that you can provide?
Bruce Stone
Posted on Jan 29, 2023I am having trouble assembling the ELVARLI wardrobe combination, and I need some help with the instructions. The shelves don't seem to be aligning properly, and I'm not sure how to adjust them. Can you provide more detailed instructions or a video tutorial on how to assemble this product?
B. Stone
Kenzo @ EasyRebuild
Answered on Jan 31, 2023To assemble the ELVARLI wardrobe combination properly, here are some tips:
Ensure the wall brackets are securely mounted and level before attaching the side panels. This will help the shelves align correctly. Use a spirit level to check the brackets are straight.
When attaching the side panels, make sure they are perfectly vertical. Double-check with a plumb line or spirit level. This will prevent the shelves from tilting.
Adjust the shelf pins in the side panels to the desired height before placing the shelves. This allows you to customize the spacing between shelves.
Gently push the shelves into place, ensuring they are level and the edges align flush with the side panels. You may need to slightly adjust the shelf pins to get the perfect fit.
Finally, attach any clothing rails or other accessories as needed. Take your time and follow the step-by-step instructions carefully. Let me know if you have any other questions


