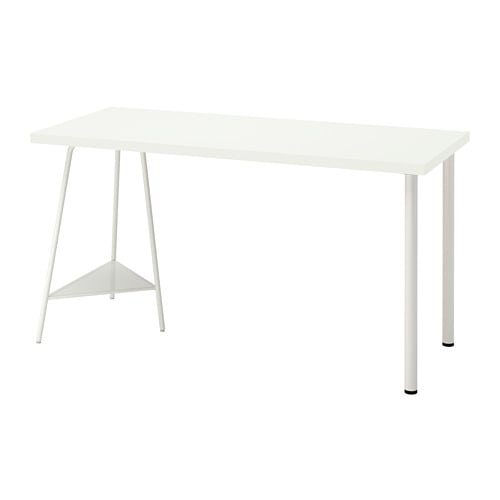
IKEA LAGKAPTEN / TILLSLAG desk instructions
Full Product Name: IKEA LAGKAPTEN / TILLSLAG Desk, white, 55 1/8x23 5/8 "
Article Number: 394.171.87
Number of user manuals: 2
Manuals and Parts List
There are 2 assembly instruction manuals to fully build IKEA LAGKAPTEN / TILLSLAG desk. Scroll down to view all.
IKEA LAGKAPTEN / TILLSLAG Product Details

LAGKAPTEN / TILLSLAG Desk, white, 55 1/8x23 5/8 "
Article number: 394.171.87
The tabletop has pre-drilled holes to make it easier to attach to the underframe.
Mix and match your choice of table top and legs – or choose this ready-made combination. Strong and light-weight, made with a technique that uses less raw materials, reducing the impact on the environment.
Measurements:
Length: 55 1/8 " (140 cm)Width: 23 5/8 " (60 cm)
Height: 28 3/4 " (73 cm)
Need help?
Have a question about IKEA LAGKAPTEN / TILLSLAG or Need to request a missing manual?
Questions and Answers
Number of questions: 3
Shah Troy
Posted on Dec 13, 2023I want to add a keyboard tray to my Lagkapten/Tillslag desk, but I'm not sure how to attach it. Can you provide instructions or recommend any products that would fit this specific desk?
Kenzo @ EasyRebuild
Answered on Dec 15, 2023To add a keyboard tray to your LAGKAPTEN / TILLSLAG desk, you can use the SIGNUM cable management tray. The SIGNUM tray can be easily attached underneath the desk using the pre-drilled holes. Simply screw the tray into the pre-drilled holes on the underside of the desk top. This will provide a sturdy mounting point for a keyboard tray. IKEA also offers the UTTRAN pull-out keyboard tray that can be installed underneath the desk and slides in and out as needed. Make sure to follow the assembly instructions carefully when installing either of these products to ensure a secure and proper fit for your LAGKAPTEN / TILLSLAG desk
Samantha Sanchez
Posted on Jun 05, 2023I'm having trouble assembling the Lagkapten/Tillslag desk. The screws provided don't seem to fit into the pre-drilled holes on the tabletop. Have you experienced this issue before?
Are there any specific tips or tricks for assembly that I might be missing?
Alice @ EasyRebuild
Answered on Jun 07, 2023The pre-drilled holes on the LAGKAPTEN / TILLSLAG desk tabletop are designed to fit the screws provided in the assembly hardware. If the screws do not seem to fit properly, there are a few things you can try:
1. Double-check that you have the correct hardware components. Ensure you are using the screws intended for this specific desk model.
2. Inspect the pre-drilled holes on the tabletop. Make sure they are not obstructed or damaged, as this could prevent the screws from threading correctly.
3. Try gently enlarging the pre-drilled holes using a drill bit slightly larger than the screw diameter. This can help the screws seat properly.
4. Ensure you are aligning the tabletop and underframe correctly before attempting to secure the screws. Proper alignment is crucial for a successful assembly.
If you continue to experience issues, please double-check the assembly instructions or contact IKEA customer service for further assistance
Charles
Posted on Oct 24, 2022I want to assemble the Lagkapten/Tillslag desk, but I'm having trouble with the tabletop not fitting properly onto the underframe. The pre-drilled holes don't seem to align correctly. Is there a specific technique or method for attaching the table top that I'm missing?
Charles
Alice @ EasyRebuild
Answered on Oct 26, 2022The pre-drilled holes on the tabletop may not align perfectly with the underframe due to slight variations during manufacturing. To properly attach the tabletop, try the following:
1. Ensure all hardware (screws, bolts, etc.) are present and accounted for as per the assembly instructions.
2. Double-check the alignment of the pre-drilled holes on the tabletop with the corresponding holes on the underframe. You may need to gently adjust the position of the tabletop to get the holes to line up.
3. If the holes still don't align, you can try enlarging the pre-drilled holes slightly using a drill bit. This will give you a bit more flexibility in positioning the tabletop.
4. Apply a small amount of wood glue to the underframe before securing the tabletop. This will help create a stronger bond.
5. Gradually tighten all the screws or bolts, ensuring the tabletop is level and securely attached to the underframe.
Let me know if you have any other questions


