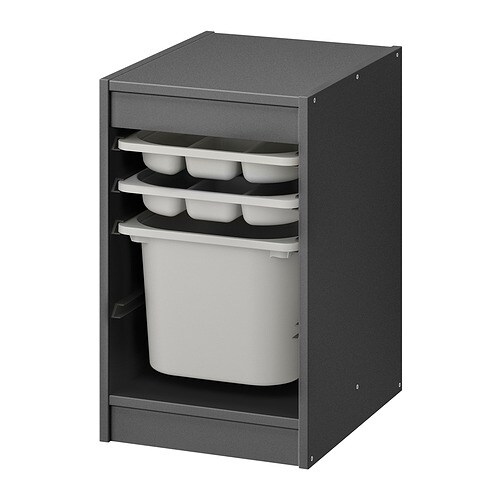
IKEA TROFAST storage combination with box/trays instructions
Full Product Name: IKEA TROFAST Storage combination with box/trays, gray/gray, 13 3/8x17 3/8x22 "
Article Number: 395.161.06
Number of user manuals: 1
Manuals and Parts List
There is one assembly instruction manual to fully build IKEA TROFAST storage combination with box/trays.
IKEA TROFAST Product Details

TROFAST Storage combination with box/trays, gray/gray, 13 3/8x17 3/8x22 "
Article number: 395.161.06
This sturdy and spacious storage solution makes it easier for your child to organize and keep everything in order.
Low storage makes it easier for children to reach and organize their things.
You can use this storage solution with trays and plastic storage boxes for a lot of things and in different ways. Maybe as a unit under or next to the desk or as a bedside table?
The tray’s compartments make it easier for your child to learn to organize, keep things in order and find small things like colouring pens, beads, strings, toy figures and collections.
If you want to protect the contents from dust and dirt, you can complete with TROFAST lid, sold separately.
Children need good and spacious storage. The TROFAST series includes sturdy wooden frames and lightweight plastic boxes, cool mesh boxes and trays that are easy to pull out, carry and put back in again.
Measurements:
Depth: 17 3/8 " (44 cm)Height: 22 " (56 cm)
Width: 13 3/8 " (34 cm)
Need help?
Have a question about IKEA TROFAST or Need to request a missing manual?
Questions and Answers
Number of questions: 3
Evans Christina
Posted on Oct 08, 2023I want to use the Trofast storage combination for my child's arts and crafts supplies. Do you have any advice on how to organize the trays and boxes to maximize space and make it easy for them to find what they need?
Kenzo @ EasyRebuild
Answered on Oct 10, 2023To organize the Trofast storage combination for your child's arts and crafts supplies, I would suggest the following:
Use the plastic storage boxes to store smaller items like markers, crayons, scissors, and other tools. Dedicate one or two boxes for each type of supply to keep them separated and easy to find.
For larger items like construction paper, stickers, and craft kits, use the open trays. You can label the trays by category, such as "Paper Supplies", "Stickers", and "Craft Kits", to help your child quickly locate what they need.
Place the most frequently used items on the lower trays, making them easily accessible for your child. Reserve the upper trays for less-used supplies.
Consider adding dividers to the trays to create smaller compartments and further organize the contents. This can help your child see at a glance where different items are stored.
With this setup, your child will be able to easily find and access their arts and crafts supplies, encouraging independent play and creativity
Barker Daryl
Posted on Jun 29, 2023I'm looking for a storage solution for my child's playroom and I'm interested in the TROFAST combination. Can you tell me if it comes with the trays or do I need to purchase them separately? Additionally, are the trays adjustable or fixed in size?
B. Daryl
Tran Ann
Posted on Mar 29, 2023I am having trouble assembling the Trofast storage unit. Can you provide instructions on how to attach the legs to the frame? I have tried following the manual, but it's not clear to me.
Tran Ann
Kenzo @ EasyRebuild
Answered on Mar 31, 2023To attach the legs to the Trofast storage frame, follow these steps:
1. Locate the four legs that came with your Trofast unit. These are typically made of sturdy plastic.
2. On the underside of the Trofast frame, you will see four pre-drilled holes where the legs need to be inserted.
3. Take one leg and align it with one of the holes. Push the leg firmly into the hole until it clicks into place.
4. Repeat this process for the remaining three legs, ensuring they are all securely attached to the frame.
5. Once all four legs are in place, your Trofast storage unit should be stable and ready for use.
If you're still having trouble, double-check that all the legs are properly aligned and pushed in fully. If needed, consult the assembly instructions again or reach out to IKEA customer service for further assistance


