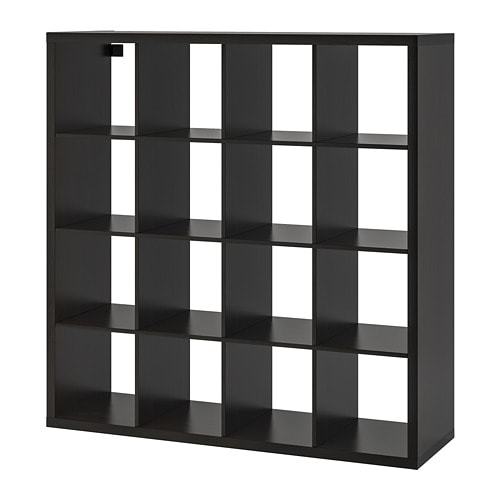
IKEA KALLAX shelf unit instructions
Full Product Name: IKEA KALLAX Shelf unit, black-brown, 57 7/8x57 5/8 "
Article Number: 102.758.62
Number of user manuals: 1
Manuals and Parts List
There is one assembly instruction manual to fully build IKEA KALLAX shelf unit.
IKEA KALLAX Product Details

KALLAX Shelf unit, black-brown, 57 7/8x57 5/8 "
Article number: 102.758.62
The simple design with clean lines makes KALLAX flexible and easy to use at home.
The smooth surfaces and the rounded edges give the shelving unit a well-thought-out and solid look.
The shelves align perfectly with the frame to create a strong and uniform style.
The flexible and adaptable construction makes it possible for you to enjoy your KALLAX for many years, even when your needs change or when you move.
You can use this shelving unit as a room divider to create a room within a room while enjoying plenty of storage.
Display your favorite items on the open shelves or add inserts to create a personalized solution with closed storage.
Shelving unit or room divider – the KALLAX series adapts to taste, space, needs and budget. Smooth surfaces and rounded corners give a feel of quality and you can personalize the shelving unit with inserts and boxes.
Measurements:
Width: 57 7/8 " (147 cm)Depth: 15 3/8 " (39 cm)
Height: 57 5/8 " (146.5 cm)
Max load/shelf: 29 lb (13 kg)
Need help?
Have a question about IKEA KALLAX or Need to request a missing manual?
Questions and Answers
Number of questions: 3
Marcus
Posted on Nov 24, 2023I am having trouble assembling the KALLAX shelf unit. Specifically, I am struggling to attach the shelves to the frame. Can you provide more detailed instructions or a video tutorial on how to do this properly?
Alice @ EasyRebuild
Answered on Nov 26, 2023To attach the shelves to the KALLAX frame properly, here are the steps:
1. Identify the shelf pins that came with the product. These are small plastic pieces that will fit into the pre-drilled holes on the frame.
2. Insert the shelf pins into the holes on the frame, making sure they are securely in place. There should be 4 pins per shelf location.
3. Carefully place the shelf onto the shelf pins, aligning it with the frame. Apply even pressure to click the shelf into place.
4. Repeat steps 2-3 for each shelf you need to install. Make sure the shelves are level and evenly spaced.
5. If you are still having difficulty, refer to the full assembly instructions that came with the KALLAX unit or check for an online video tutorial. Taking your time and double-checking the steps can help ensure a proper assembly.
Let me know if you have any other questions
Alexis Sullivan
Posted on Jan 17, 2023I'd like to know if it's possible to add additional shelves or adjust the height of the existing ones?
Alexis Sullivan
Kenzo @ EasyRebuild
Answered on Jan 19, 2023The KALLAX shelf unit is designed to be flexible and adaptable to your needs. You can add additional shelves or adjust the height of the existing ones.
The KALLAX series has a modular design that allows you to customize the shelving unit. You can purchase additional KALLAX shelf inserts to add more shelves as needed. The shelf inserts come in various sizes and can be placed at different heights to suit your storage requirements.
To adjust the height of the existing shelves, you can simply remove the shelf and reposition it at the desired height. The shelf pins on the KALLAX frame allow you to easily move the shelves up or down.
This flexibility makes the KALLAX shelf unit a great option to accommodate changing storage needs over time, even if you move to a new space
Dustin
Posted on Oct 21, 2022I'm having trouble assembling the Kallax shelf unit. The instructions are unclear and I'm missing a piece. Can you provide me with additional guidance on how to assemble it?
Kenzo @ EasyRebuild
Answered on Oct 23, 2022To assemble the KALLAX shelf unit:
1. Ensure you have all the required parts and hardware. Double-check the contents against the assembly instructions.
2. Start by laying out the side panels on a flat surface. Attach the top and bottom shelves to the side panels, making sure the holes align properly.
3. Insert the screws or cam locks provided and tighten them securely. This will create the basic frame of the unit.
4. Next, attach the remaining shelves, making sure they are level and evenly spaced. Refer to the instructions for the proper placement.
5. If you are missing a piece, contact IKEA customer service. They should be able to provide the missing part or offer guidance on how to proceed without it.
6. Take your time and follow the step-by-step instructions carefully. If you encounter any issues, refer back to the manual or contact IKEA for further assistance


