IKEA BESTÅ shelf unit with door instructions
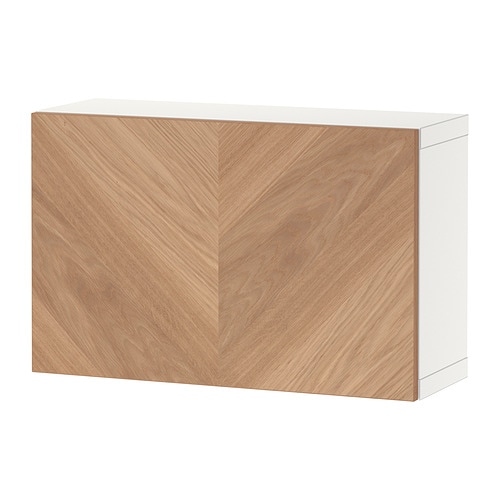
Full Product Name: IKEA BESTÅ Shelf unit with door, white/Hedeviken oak veneer, 23 5/8x8 5/8x15 "
Article Number: 394.249.65
Number of user manuals: 3
Manuals and Parts List
There are 3 assembly instruction manuals to fully build IKEA BESTÅ shelf unit with door. Scroll down to view all.
1. Instructions for IKEA Besta frame white


2. Instructions for IKEA Besta soft closing push open hinge


IKEA BESTÅ Product Details

BESTÅ Shelf unit with door, white/Hedeviken oak veneer, 23 5/8x8 5/8x15 "
Article number: 394.249.65
Create unique and varied patterns on your BESTÅ with the help of the visible grains on HEDEVIKEN doors.
A simple unit can be enough storage for a limited space or the foundation for a larger storage solution if your needs change.
Everything you need for storing and keeping things organized at home. Choose a ready-made combination or create your own, adapted to your style and belongings. This is just one of many, many possibilities.
Measurements:
Width: 23 5/8 " (60 cm)Depth: 8 5/8 " (22 cm)
Height: 15 " (38 cm)
Need help?
Have a question about IKEA BESTÅ or Need to request a missing manual?
Questions and Answers
Number of questions: 1
Joshua Alvarado
Posted on Sep 24, 2023I've assembled my BESTÅ shelf unit with door and it looks great! However, I noticed that the door doesn't quite align properly when closed.
Is there a specific way to adjust the hinges or is this just a minor issue?
Kenzo @ EasyRebuild
Answered on Sep 26, 2023The door not aligning properly when closed is a common issue that can be addressed by adjusting the hinges. Here are the steps to adjust the BESTÅ door hinges:
1. First, make sure all the screws on the hinges are tightened securely. Loose screws can cause the door to become misaligned.
2. If the door is still not aligning correctly, you can adjust the hinges by turning the adjustment screws. There are typically three adjustment screws on each hinge - one for up/down, one for left/right, and one for in/out.
3. Start by adjusting the left/right screw. Turn it clockwise to move the door to the right, and counterclockwise to move it to the left.
4. Next, adjust the up/down screw to raise or lower the door as needed.
5. Finally, use the in/out screw to adjust the depth of the door and ensure it aligns properly with the cabinet frame.
Make small adjustments at a time and check the alignment after each adjustment. With a bit of fine-tuning, you should be able to get the door aligned perfectly


