IKEA BESTÅ wall-mounted cabinet combination instructions
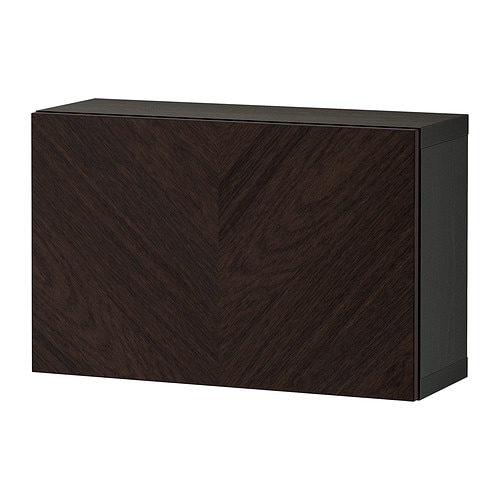
Full Product Name: IKEA BESTÅ Wall-mounted cabinet combination, black-brown Hedeviken/dark brown stained oak veneer, 23 5/8x8 5/8x15 "
Article Number: 394.292.51
Number of user manuals: 4
Manuals and Parts List
There are 4 assembly instruction manuals to fully build IKEA BESTÅ wall-mounted cabinet combination. Scroll down to view all.
1. Instructions for IKEA Besta frame black brown


2. Instructions for IKEA Besta soft closing push open hinge


3. Instructions for IKEA Besta suspension rail silver color


IKEA BESTÅ Product Details

BESTÅ Wall-mounted cabinet combination, black-brown Hedeviken/dark brown stained oak veneer, 23 5/8x8 5/8x15 "
Article number: 394.292.51
Create unique and varied patterns on your BESTÅ with the help of the visible grains on HEDEVIKEN doors.
A simple unit can be enough storage for a limited space or the foundation for a larger storage solution if your needs change.
Everything you need for storing and keeping things organized at home. Choose a ready-made combination or create your own, adapted to your style and belongings. This is just one of many, many possibilities.
Measurements:
Width: 23 5/8 " (60 cm)Depth: 8 5/8 " (22 cm)
Height: 15 " (38 cm)
Need help?
Have a question about IKEA BESTÅ or Need to request a missing manual?
Questions and Answers
Number of questions: 4
Tonya
Posted on Mar 25, 2024I am having trouble assembling the BESTÅ wall-mounted cabinet combination. The instructions are unclear and I'm missing one of the screws. Can you please provide me with a detailed manual or suggest where I can find one? Additionally, is it possible to purchase replacement screws or parts if needed in the future?
Tonya
Alice @ EasyRebuild
Answered on Mar 27, 2024To assemble the BESTÅ wall-mounted cabinet combination, refer to the instruction manual that came with the product. If you've misplaced the manual, you can find a digital version on the IKEA website. The instructions will guide you through the step-by-step assembly process.
If you're missing a screw, you can purchase replacement hardware from your local IKEA store or through their online spare parts service. IKEA offers a wide range of spare parts and accessories to ensure you can easily maintain and repair your BESTÅ unit in the future.
For any additional assistance, you can also contact IKEA customer service, who will be happy to provide further guidance on assembling and maintaining your BESTÅ wall-mounted cabinet
Annette
Posted on Jan 01, 2024I'm considering purchasing this BESTÅ wall-mounted cabinet combination, but I have a question about the installation process. Do I need to drill any holes in the wall for the mounting hardware, or is it designed to be installed using adhesive or other non-permanent methods?
Kenzo @ EasyRebuild
Answered on Jan 03, 2024The BESTÅ wall-mounted cabinet combination requires drilling holes in the wall for the mounting hardware. It is not designed to be installed using adhesive or other non-permanent methods. You will need to securely attach the wall-mounting brackets to the wall using screws or anchors to properly support the weight of the cabinet. Carefully follow the included installation instructions to ensure a safe and secure mounting of the BESTÅ unit
Autumn
Posted on Sep 01, 2023What kind of screws or hardware are needed to mount this cabinet on a wall?
And is the back panel removable for easier installation or future changes?
David Washington
Posted on Oct 14, 2022What kind of screws or hardware are needed to mount this cabinet on a wall? And is the back panel removable for easier installation or future changes?
Alice @ EasyRebuild
Answered on Oct 16, 2022To mount the BESTÅ wall-mounted cabinet combination on the wall, you will need wall anchors and screws that are suitable for the type of wall material. The exact hardware required will depend on the wall construction, but generally, you would need drywall anchors and screws.
The back panel of this BESTÅ cabinet is removable, which can make the installation process easier. You can detach the back panel to access the wall more easily and then reattach it once the cabinet is mounted. This also allows for future changes or modifications if needed


